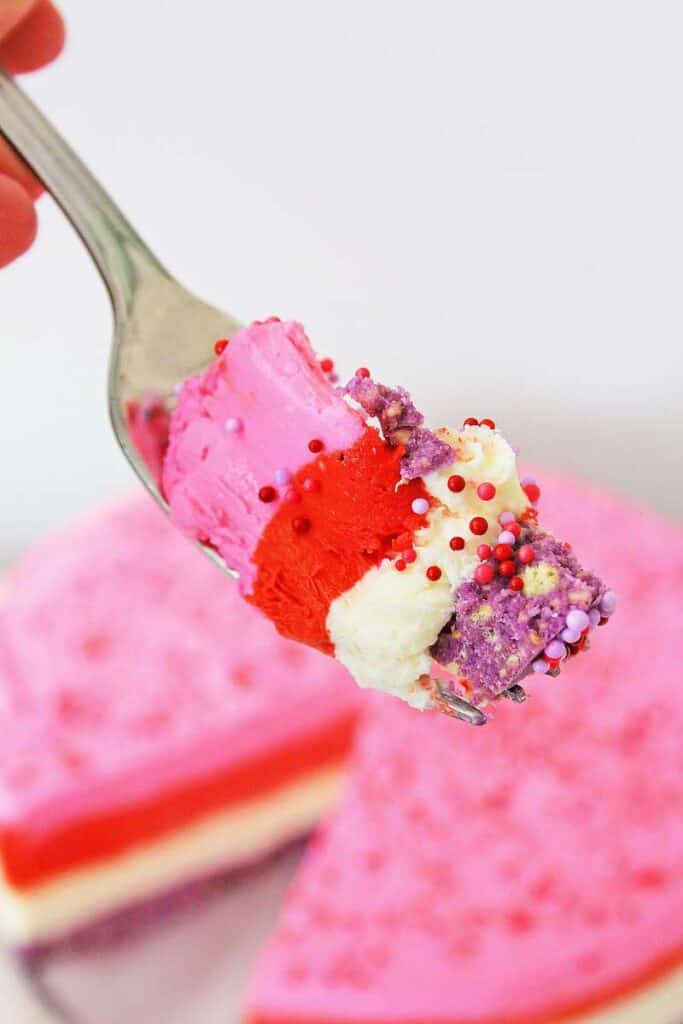
Valentine’s No Bake Cheesecake
This post may contain affiliate links. See our Privacy Policy for details.

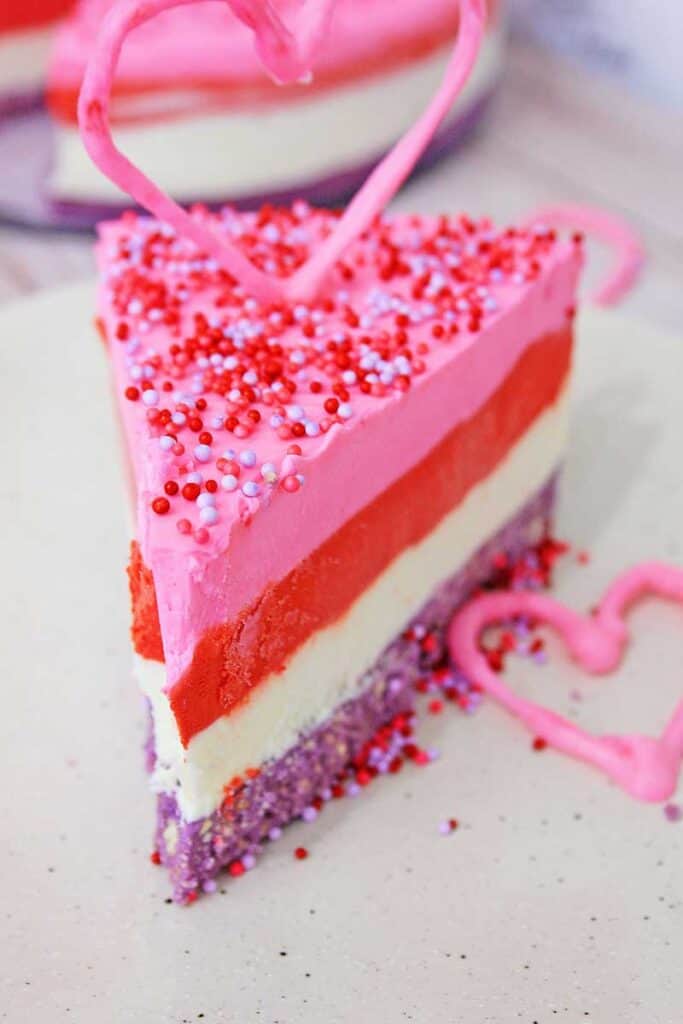
This Valentine’s No Bake Cheesecake is the perfect sweet treat to celebrate love without breaking a sweat in the kitchen. With its creamy texture, festive look, and no oven required, it’s a dessert you’ll adore making (and eating!)
Want to save this recipe?
Enter your email & I’ll send it to your inbox. Plus, get great new recipes from me every week!
There’s no better excuse to whip up some cheesecake than Valentine’s Day, am I right? This super easy and oh-so-pretty layered Valentine’s Day No Bake Cheesecake is perfect for school parties, a romantic dinner for two, or anywhere in between.
Why I love this recipe
I love how special this cheesecake looks and how I can make it ahead of time and store it in the freezer until it’s ready to serve. Easy and delicious is a winner for me!
Ingredients
- shortbread prepared crusts
- cream cheese
- sugar
- powdered sugar
- sour cream
- lemon juice
- vanilla extract
- red, pink, and purple gel food colorings
- heavy whipping cream
Step by step
This no-bake cheesecake takes a little bit of patience but it’s worth it in the end I promise! It’s not difficult but you do need to let each layer of cheesecake set up in the fridge for an hour before adding the next.
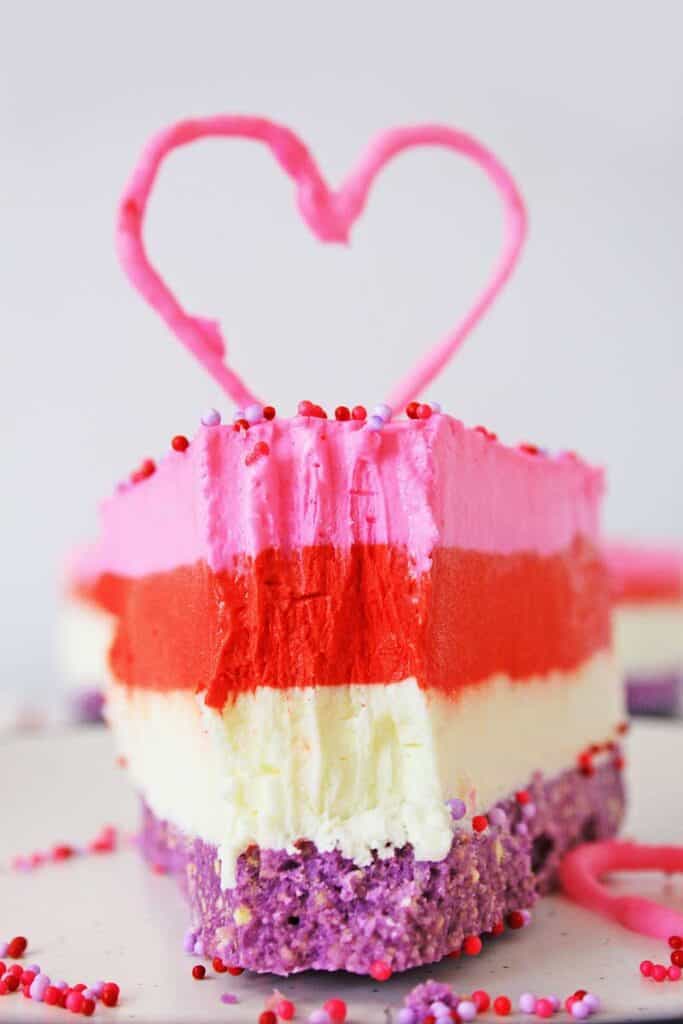
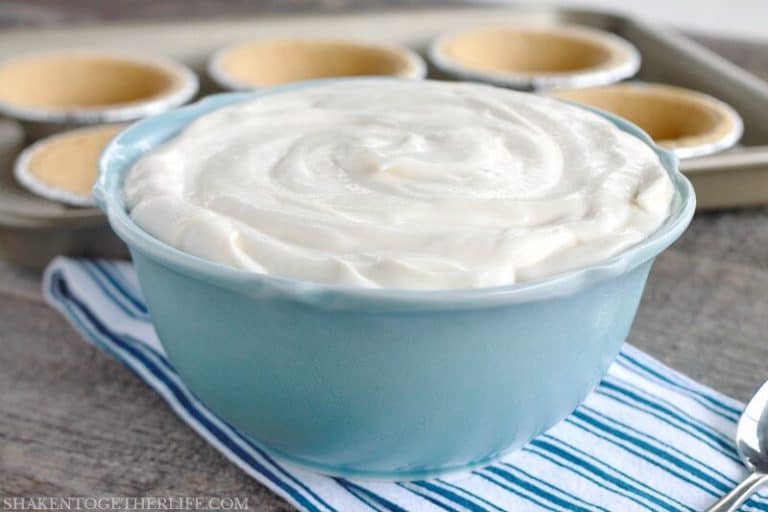
- Crush the shortbread crusts and dye them purple with the food coloring. Press into the bottom of a springform pan. (Add some sprinkles for a special touch!) Set the pan in the freezer as you move on to the next steps.
- Mix up the whipped cream and set that in the refrigerator.
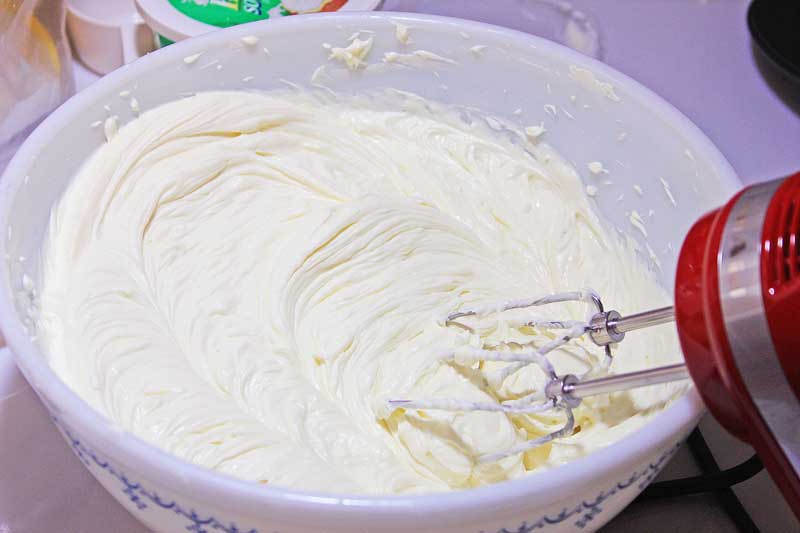
- Now it’s time to make cheesecake! Mix the cheesecake filling ingredients until blended evenly and stiff peaks form. Add the whipped cream from the fridge and mix until blended.

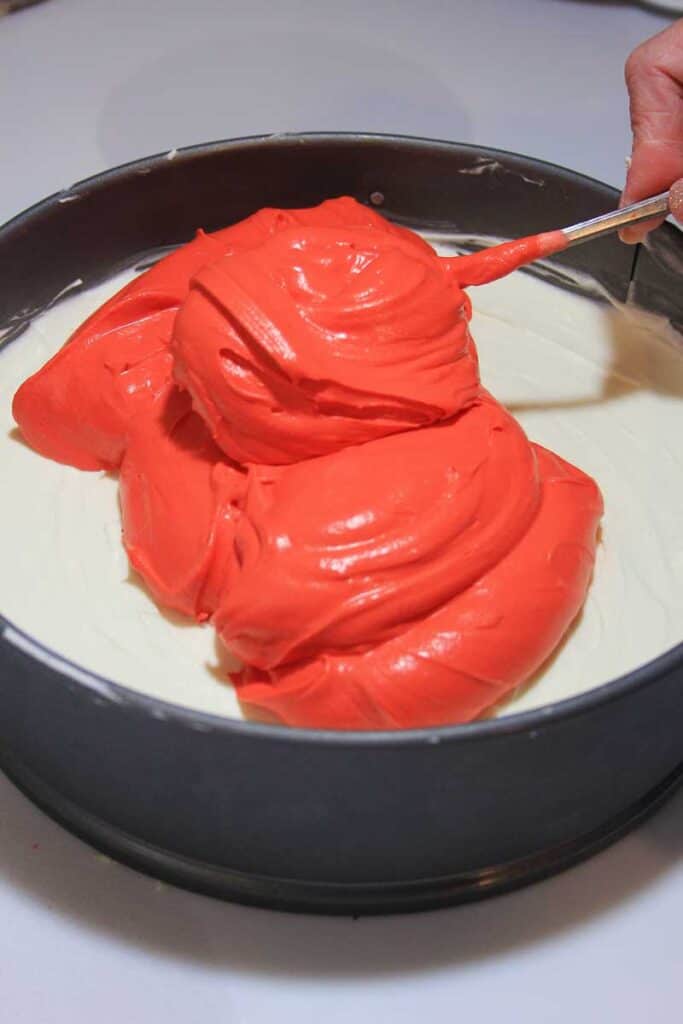
- Divide the filling into three equal portions. Keep one white, color one red, and one pink. Place the pink and red filling bowls in the fridge.
- Layer the white filling over your prepped crust then freeze for an hour. Repeat with the other layers, adding one layer then freezing before adding the next. (adding sprinkle on top if desired)
- Finally, cover and keep in the freezer until ready to serve!
To make the pretty little heart garnish, pipe icing onto wax paper and freeze.
Tips for Best Results
Be patient! The extra time this cheesecake takes is worth it for that gorgeous, extra-special, extra-pretty layered look!
Variations
You can easily change the colors of the cheesecake or top with sliced fresh strawberries or chocolate chips to change it up a bit.
Storage
Keep the cheesecake in the freezer, it will not stay set up at room temperature or in the fridge.
Store up to two weeks in the freezer. You can also slice and freeze individual slices to enjoy later.
If you try this recipe please comment and give it a 5-star rating below, I love hearing from you!
If you liked this recipe, you’ll love my free 5-Ingredient Dinner Challenge.
I’ll send you super simple meals that use just five ingredients and come together fast — perfect for busy weeknights when you don’t want to overthink dinner.

Valentine’s No Bake Cheesecake
- Total Time: 4 hours
- Yield: 12 1x
Description
This Valentine’s No Bake Cheesecake is the perfect sweet treat to celebrate love without breaking a sweat in the kitchen. With its creamy texture, festive look, and no oven required, it’s a dessert you’ll adore making (and eating!)
Ingredients
- 2 Keebler brand shortbread crusts
- 2 cups of heavy whipping cream
- 1/4 cup + 2 tablespoons powdered sugar divided
- 1 teaspoon + 1 tablespoon vanilla extract
- (4) 8 ounce packages of cream cheese – softened
- 1 cup of sugar
- 1/2 cup sour cream
- 2 teaspoons of lemon juice
- red food coloring gel
- pink food coloring gel
- purple food coloring gel
Instructions
- Line a 9 inch spring-form pan with Parchment paper, set aside.
- Place the 2 shortbread crusts in a large bowl, and break up the crusts into crumbs.
- Add about 1 teaspoon of purple food coloring gel to the shortbread crumbs, and mix well, making the crust purple. If you need to add a little more purple food coloring gel for a brighter color, add 2 or 3 drops at a time until you get the color desired.
- Place the purple crumbs in the spring-form pan on top of the parchment paper, and smooth out evenly.
- Place the spring-form pan in the freezer.
- In the bowl of a stand mixer, place the 2 cups of whipping cream, 1/4 cup of powdered sugar, and 1teaspoon of vanilla, and mix on low until blended.
- Turn mixer up to high speed, and whip the cream until stiff peaks form.
- Place the whipped cream in the refrigerator.
- Rinse the mixing bowl, and dry with a paper towel.
- Add the softened cream cheese, and sugar to the mixing bowl, and blend until creamy.
- Add the powdered sugar, sour cream, lemon juice, and vanilla, and blend well.
- When the cream cheese mixture is fluffy remove the mixing bowl from the stand mixer, and gently fold the whipped cream into the cream cheese mixture until completely incorporated.
- Divide the cheesecake mixture into thirds; leave the white portion in the mixing bowl, and place the other two parts into two separate bowls, with an equal amount in each container.
- Using food coloring gel, drop 4 drops of red food coloring gel in one container, and 6 pink drops in the other container. Stir the food coloring gel into the cheesecake, making one part red, and one part pink, and the white left in the mixing bowl. If the red is not bright enough, and another drop or two until you get the bright red color desired. Do the same with the pink until you get the desired pink color.
- Place the red cheesecake and the pink cheesecake in the refrigerator.
- Remove the Spring-form pan with the purple crust from the freezer, and pour the white layer of cheesecake on top of the purple crust, and spread evenly.
- Place the Spring-form pan back in the freezer for about an hour, and when the white layer is set to the touch (it’s almost frozen) add the red layer of cheesecake on top of the white layer, and spread evenly in the pan.
- Place the Spring-form pan back in the freezer for about an hour, and check to see that’s it’s almost frozen, and pour the pink cheesecake on top of the red layer, and spread evenly in the pan.
- Place the Spring-form pan back in the freezer and leave for an hour. After an hour, place parchment paper and foil over the pan, covering and sealing the cheesecake. Leave the cheesecake in the freezer until time to serve. Cut into 2 inch pieces, serve and Enjoy!
Notes
- Keep the cheesecake in the freezer for up to 14 days.
- If you have 2 mixing bowls for your electric stand mixer, you can just put your mixing bowl in the refrigerator with the whipped cream, and use your clean mixing bowl, instead of rinsing it out.
- Store and serve straight from freezer, it will not stay set up if stored at room temperature or in the refrigerator.
- Prep Time: 45 minutes
- Category: dessert
- Method: freezing
- Cuisine: American
Nutrition
- Serving Size:
- Calories: 631
- Sugar: 39.2 g
- Sodium: 478 mg
- Fat: 44.6 g
- Carbohydrates: 52 g
- Protein: 7.6 g
- Cholesterol: 102.4 mg

I cant wait to make this. What is the heart on top of the cake made of?
It’s icing piped onto wax paper and frozen